Welcome to the Canvas faculty help page. At UCF, we call Canvas ‘Webcourses.’ Webcourses is the name UCF created for its Learning Management System (LMS). The purpose of this page is to provide faculty with useful tips, guides, tutorials, and updates for Webcourses.
*Don’t have time to scroll through each tip? No problem. Simply run a search on this page to immediately jump to your question. If you can’t find an answer to a specific question, click on the Instructor Videos link, the Instructor Guide, or check out the Canvas Community.
How do I create a Home Page for my course?
It is important to create a landing page that shows students how to navigate your course. Starting students on a page that immediately shows your modules is a bit impersonal. The home page offers them a resources page that prepares them to be successful in your class. In fact, you can use the homepage to link directly to modules, assignments, and quizzes, and then have the option to remove those tools from the navigation to reduce confusion (the Faculty Center recommends this method).
How do I customize the Navigation/Menu area?
You may not want students to have access to every navigation/menu option that is available. To hide tools, click SETTINGS and then NAVIGATION and you can drag tools to the bottom, which will hide them from students.
The Faculty Center recommends that you hide tools that you are not using to minimize confusion for students.
How do I add a Teaching Assistant?
Adding a GTA is not a function faculty can perform directly. Instead, ask your departmental scheduler to add the GTA officially as a “teaching assistant” in PeopleSoft (myUCF).
Note: the GTA also needs to have completed the GTA Training for which they’ve been assigned.
What steps do I need to perform before the semester starts?
This guide from CDL (the office that supports fully-online teaching) offers a semester start-up checklist. Topics include Academic Engagement, Grade pullback, and third party tools (like Simple Syllabus).
How do I get my official class shell? How can I request a blank “development” shell as a sandbox?
Webcourse shells for official on-transcript courses are created automatically several months before the semester begins. They will be visible when you click “All courses.”
If you wish to pre-build content and later import it to the official class shell, you can request a “special programs course” here.
How do I combine multiple sections into a single Webcourse?
-
- Sign on to the myUCF Portal with your NID and NID password.
- In the myUCF Menu, click Faculty/Advisor Self Service.
- Click Instructors and then Faculty Webcourse Manager.
- In the Combine Sections column, click one of the sections that you want to combine.
- In the next screen, click the check box for each section you want to add.
- Click OK and then Save.
Note that you may not undo this process after the semester begins.
How do I create an assignment in Webcourses?
Knowing how to create an assignment in Webcouses is essential. Your entire course depends on each assignment created for your students.
How do I enable Turnitin (plagiarism detection) for an assignment?
Open the Assignments tool in your course. For a new assignment, click the +Assignment button. For an existing assignment, click on the name of the assignment and then click the Edit button. In the edit settings, scroll to the option for Submission Type and change the drop-down to Online. Then select the option for File Uploads. The Plagiarism Review option will appear. Change the drop-down to Turnitin. You will then see optional Turnitin settings, including when student can view their originality scores. Once you have edited editing these settings, click the Save button at the bottom. Keep in mind that the Turnitin originality score may or may not indicate plagiarism and, by itself, a percentage of match should never be used as an acceptable threshold. Theses, dissertations, and faculty research should be run through iThenticate, not Turnitin. For more information on iThenticate, click here.
Where can students see the assignments I’ve created for them in Webcourses?
Students can view assignments in a number of places. The first place is on their Dashboard.
-
- On the right side of their dashboard, a To Do list is visible that shows all assignments for all courses in which they are enrolled.
- The next place students can view their assignments is within the actual course. When they click on a course, a To Do list appears in the same place on the screen that it does on the Dashboard.
- The next place they can see their assignments is on the Course Calendar. The Course Calendar button is located on the right side of the screen above the To Do list. When students click on this link, they can see their upcoming assignments for all of their courses. Watch this short video on the value of the Course Calendar tool.
- Students can also view their assignments on the Course Summary that is automatically created when you create new assignments. The Course Summary displays a list of all assignments, discussion, quizzes, and course events.
Everything you need to know about assignments can be found here.
How do I create a quiz in Webcourses?
There are a couple of ways to create quizzes in Webcourses. *Everything you need to know about Quizzes* can be found here.
In addition to the Classic quizzes option, there is also the New quizzes option.
Faculty who are interested in converting their Classic Quizzes into New Quizzes can follow the steps on this Canvas Instructor Guide page.
How do I access Student View?
Student View is located at the top, right-hand side of most pages next to the webcourse@ucf logo. If you are on a page that does not display the Student View option, simply click on Home on the left sidebar. Student View will appear at the top right of the page.
Please note that when you click on the “View as Student” button, a “Test Student” will be added to your course roster. Be sure to leave the grading columns blank for this test student or to excuse the Test Student from your course assignments.

How do I make grades visible?
Are your students telling you they are unable to see grades you know you have entered? If so, these next steps will quickly guide you to a solution.
-
- Open the specific Webcourse.
- Click on Grades.
- Find the assignment in question.
- You can locate the assignment by either using the scroll bar at the bottom of the page, or you can enter the name of the assignment in the Assignment Names search bar located at the top of the page.
- You should see an eye with a slash through it next to the name of the assignment.
- Next, hover your mouse over the assignment’s name until the vertical “triple dots” (a.k.a., “kebab” or “hamburger”) menu appears.
- Click on the triple-dots menu.
- Click on the option to Post Grades.
- Click “everyone” and “post”.
The eye should disappear, and the assignment will now be visible to students.
- Double check visibility by entering Student View and checking to see if you can now see the assignment students were unable to see.
- Note: if you enter the gradebook, and there is no eye on the specific assignment, the assignment should be visible to students.
- Please refer to this Canvas Instructor Guide page for more information.
How do I give extra credit?
Option 1—Add extra credit points to a graded assignment:
During or after assignment grades have been entered, the instructor may manually add extra points to a student’s score.
-
-
- To avoid confusing the student about the points earned vs. points awarded, it is recommended to note both the original score and the points added in the grade comment field.
-
Option 2—Add one extra credit assignment to an existing assignment group:
-
- Create a new assignment and give it a clear label (for example, Midterm Extra Credit).
- In the assignment settings, leave the point value at zero.
- Then, in the Gradebook, enter the extra credit points for only those students who earned it.
- Or, to save time when most or every student will be awarded the extra credit points, use the gradebook column header options to “Set Default Grade.”
Option 3—Set up an extra credit assignment group:
-
- In the Canvas Assignments Tool, create a new assignment group and label it “Extra Credit.”
- Use the Assignment Group Settings (3 dots in the upper right of your window) and select “Assignment Groups Weight.”
- Checkbox “Weight final grade based on assignment groups.”
- Assign percentage weights to total 100% for all non-extra credit groups and then assign a percentage to the extra credit group that represents the total percentage of extra credit possible for the entire semester, usually 3%-10%, but that is up to the instructor.
- Then add as many extra credit assignments as you wish to this group, but for these assignments, do enter a points possible value (not zero) in the assignment settings.
- Since the letter grade scheme is based on only 100% of the points, any points in the extra credit group will increase student scores.
- One advantage to this option is improved transparency. In the student view of the gradebook, the students will clearly see the grade they earned and separately the extra credit awarded.
*Gradebook Tip*
Activate the “test student” row at the bottom of the gradebook. Do this by following these directions:
-
-
- Navigate to the student view of the Webcourse.
- Select the Grades tool.
- Next, leave the student view.
- You will now see the test student row in the instructor view of the gradebook.
- Next, award the test student full credit for every column in the gradebook.
- The total column will then show a percentage in excess of 100% (whatever maximum extra credit you assigned).
-
Learn more about how to give extra credit here.
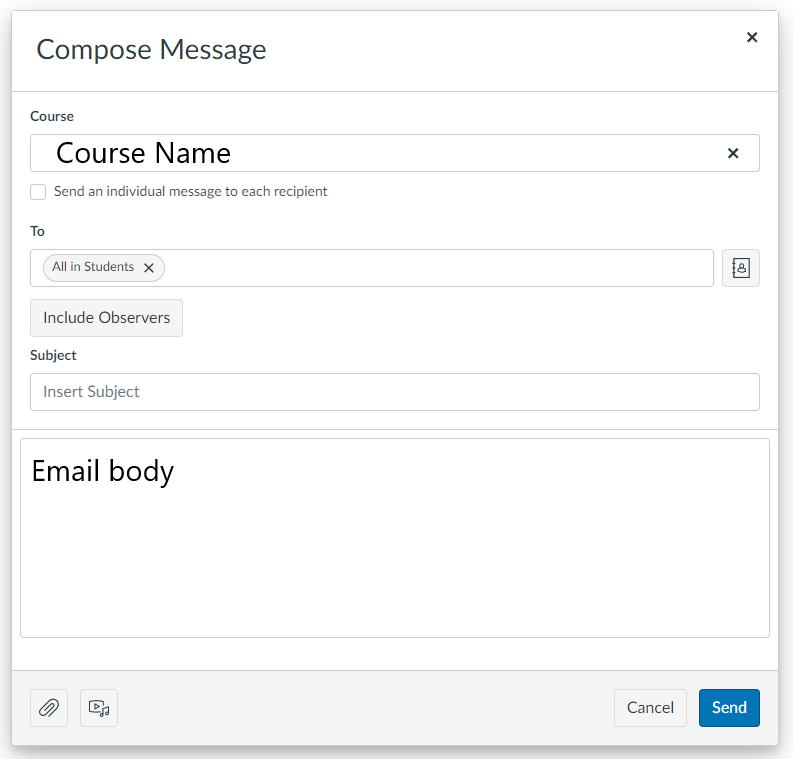
How do I send an email via Webcourses?
After logging into Webcourses, click the “Inbox” link on the left sidebar. To create a new email, click the Compose a new message icon on the top, right side of the page.
 Select the desired course in the “Course” field. If you want to send individual messages to each student, check the “Send an individual message…” box. In the “To” field, select the desired audience of the email recipient(s). Select either all in the audience or the individual person you want to email from the audience. Enter a subject in the “Subject” field and compose your email in the email body window.
How do I create an announcement for my students?
There are two answers to this question. You can create a general announcement or a video announcement. With a general announcement, you can create announcements on the spot, or you can create all your announcements in advance and delay/schedule posting.
A video announcement can be created with the Canvas app and is great for accessibility. Students can even use this feature.
Watch this short video on how to create video announcements.
How do I use the gradebook in Webcourses?
The gradebook in Webcourses offers so many helpful features. Learn more about grades and the gradebook.
*For an extended tutorial on how to use the gradebook, we recommend watching How to use Gradebook.
What is the Speedgrader?
The SpeedGrader allows instructors to view and grade student assignment submissions in one place using a simple point scale or complex rubric. Canvas accepts a variety of document formats and even URLs as assignment submissions. Some document assignments can be marked up for feedback directly within the submission. You can also provide feedback to your students with text or media comments.
Learn more about Speedgrader in the Canvas Guides, or view Speedgrader FAQs.
How can I create a rubric for my assignments?
Rubrics are a handy tool that offer explicit expectations for your assignments. Rubrics can be attached to assignments, discussions, and quizzes (*cannot be used for grading in quizzes) in Webcourses. Watch the following video to guide you.
Here is a link for how you can use a rubric for grading. If you set up a rubric and use this rubric for grading, then each cell in the rubric will assign the score indicated and automatically add up the grade in the Speedgrader.
Here is a link for everything you need to know about rubrics.
If I’ve taught this same course in a previous semester, can I simply copy the information from the previous course to my current course? If so, how?
Yes! You can copy course content such as assignments, modules, pages, and discussions from previous Canvas courses into existing courses. You can also bulk migrate quizzes from Classic Quizzes to New Quizzes. You only have access to copy content from courses in which you are enrolled as a user with instructor permissions. You can also copy course content from courses that are personally shared with you or shared in the Commons.
Learn about the Course Import Tool here.
What are Groups in Webcourses?
Groups are a small version of a course and used as a collaborative tool where students can work together on group projects and assignments. Find the FAQs for Groups here.
What is the Canvas Commons?
The Canvas Commons is a learning object repository that allows instructors to share and import educational resources.
Where can I find ongoing Webcouses (Canvas) updates?
The above list of FAQs will remain current, but here are a couple more places you can check.
On the navigation panel (left margin of your Webcourses screen), click on the ‘help’ question mark at the bottom of the panel. It will take you to the Canvas Guides.
How can I use Panopto for my courses?
Panopto is one of the leading video lecture capture technologies available on the educational technology market. Find out how you can use Panopto in your classroom.
How can I download or archive my courses?
Instructors are encouraged to download an export file of their course content so that you can have a local copy for future years after the current Canvas course “ages out” and faces deletion. The downloaded .imscc files are only readable by re-uploading into another Canvas shell. Should you wish to obtain readable files of your course, enable the ePub option in settings.
Links from Instructure
- Canvas Roadmap. This official page shows the forecast of new and upcoming features and releases within Canvas, as well as links to blogs and conversations that provide additional context.
- Canvas Status and Downtime Tracker. This official page shows the current status of Canvas and lists previous events, in case this helps you decide on extending due dates.
Updates to Canvas
The following link will help keep you up to date on all upcoming Canvas changes which occur every three weeks.
- Specific changes are announced the week before in the Production Release notes. You can follow these and receive a copy via email every three weeks.
- For more information, go to this website.
Bugs and Workarounds
- Uploading a gradebook with newly added columns will fail if the columns are added *after* the “totals” columns in the CSV file (this assumes you are using a previously downloaded CSV from Canvas). Add your new columns *before* the Totals columns to prevent the problem.
- Midterm grades will normally ignore missing grades. If you checkmark “treat missing grades as zero” in EITHER the gradebook or the eGrades gear setting, your gradebook may not match what is imported into eGrades. If a workaround is needed, you could export the gradebook to find the column for “current total” with numeric percentages. Rename the column to something like “midterm grades” and import the .csv file. You can now point eGrades to this temporary column as the source for the midterm grade.
- Grade submission at the END of the semester can be misleading if you do not first checkmark “treat missing grades as zero” in the gradebook settings. If you fail to take this step, the displayed grade will ignore missing scores and pretend they don’t exist, but those missing scores become zeros, with no way to stop the process, when you submit through eGrades. Thus, the onscreen displayed grade may be higher than what is actually submitted to eGrades.
- When students have taken a quiz and are unable to see which questions they answered incorrectly, check the quiz settings. If the settings are set to show one question at a time, students cannot see which questions were incorrect. When that option is off, students can see which questions were answered incorrectly.